How to Turn a Hand-Drawn Sketch into a Working App Preview Using Google Gemini Canvas
Google's Gemini Canvas can reportedly turn a photo of your hand-drawn wireframe into an app preview. Here's how to approach the workflow — and what most people get wrong when sketching for AI.
You sketched an app idea on a napkin at lunch. Maybe it was a booking page for your side business, or a homework tracker your kid actually wants to use, or a simple dashboard for your freelance clients. The sketch made sense in your head. But turning it into something real? That used to mean hiring a developer, learning to code, or spending weeks in a design tool you'd forget how to use by next month.
That gap between "I drew it" and "it works" just got a lot smaller.
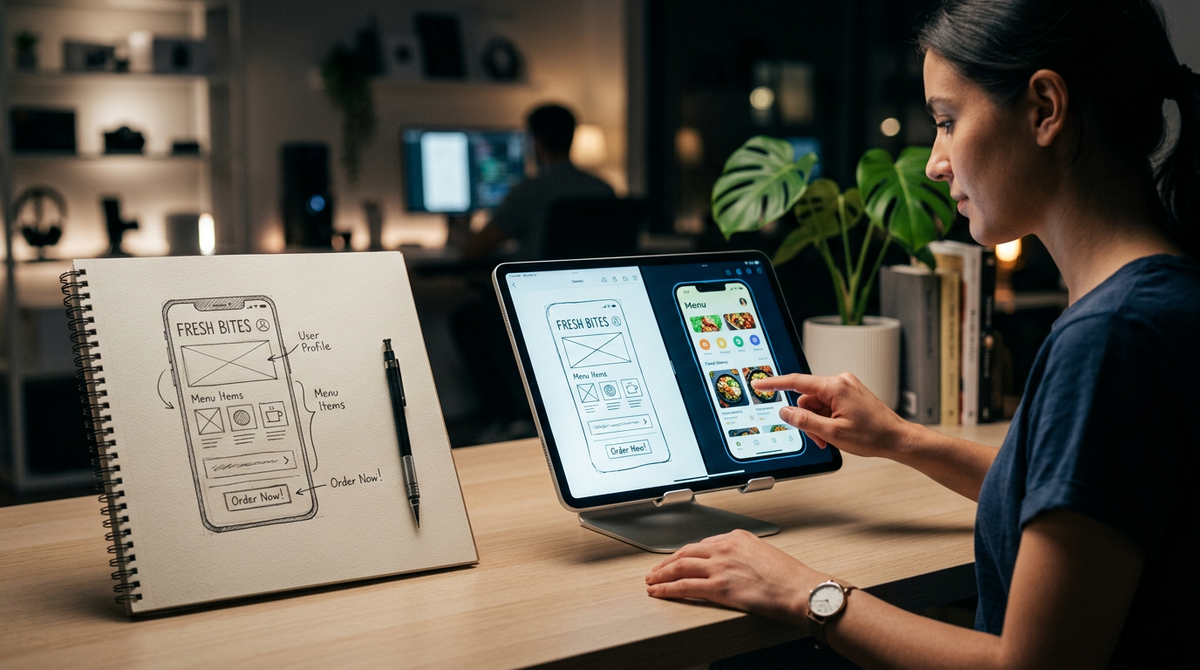
Recently, reports emerged about a Gemini Canvas feature that does something genuinely interesting: according to Prompts Journey, Gemini can turn a hand-drawn sketch into a working app preview. The concept is straightforward — you photograph a hand-drawn wireframe, upload it, and Gemini generates a visual app preview based on your layout. Then you iterate, refining the design through conversation. No code required.
Because this feature is still new and detailed documentation from Google is limited, some of the specific capabilities described below are based on reasonable expectations from how similar AI prototyping tools work and from early reports. Your actual experience may vary as Google continues to develop the feature. That said, the core workflow principles — how to sketch for AI, how to prompt effectively, and how to think about prototyping — apply broadly to any AI-powered sketch-to-prototype tool.
Here's how to approach this workflow well, what makes a sketch AI-readable, and where most people trip up.
What Sketch-to-App AI Tools Generally Do (And Don't Do)
Before you start sketching, it helps to understand what's likely happening under the hood — in plain terms.
When you upload a photo of a hand-drawn wireframe to an AI tool like Gemini Canvas, the AI analyzes the visual layout: where boxes are positioned, what text labels say, how elements relate to each other spatially. Based on early reports, it then generates a visual preview — meaning you get something that looks like an app in your browser. Depending on the tool's capabilities, interactive elements like buttons and forms may function to varying degrees.
What tools like this almost certainly do not do is build a production-ready application with a database, user authentication, payment processing, or any back-end logic. Think of it as a visual prototype — the kind of artifact you'd normally need a designer to create before any real development begins. Professional designers using tools like Figma typically charge significant fees for this kind of interactive prototyping work, so even a rough AI-generated version represents real value.
That distinction matters. This type of tool is for prototyping and communicating ideas, not for shipping software. But for most people reading this, that's exactly the bottleneck. You don't need a finished product today — you need something you can show your co-founder, your developer, your team, or your client and say, "This is what I mean."
And that's where a sketch-to-app workflow genuinely shines.
What Makes a Good Sketch for AI Interpretation
This is the part most tutorials skip, and it's the part that matters most. Regardless of which AI tool you use, the quality of your sketch directly determines whether the AI produces something usable or something broken. These principles apply to Gemini Canvas and to any visual AI that interprets hand-drawn wireframes.
Here's what works:
Use Clear Boxes for Every Element
AI tools interpret rectangles as UI components. A box with the word "Search" inside it becomes a search bar. A box labeled "Submit" becomes a button. A large box at the top of the page becomes a header.
Draw distinct, closed rectangles. Don't leave lines open or overlapping. If two elements are separate — say, a sidebar and a main content area — make sure there's visible space between them. AI reads spatial relationships literally. If your sidebar box touches your content box, the tool may merge them into one element.
Label Everything With Readable Text
Print, don't use cursive. Seriously. AI visual understanding has improved dramatically, but it still struggles with handwriting that humans would squint at. Block letters, written clearly, inside or directly next to each element.
Good labels are specific: "User Name," "Price: $XX," "Add to Cart," "Weekly Schedule." Vague labels like "stuff goes here" or "content" give the AI nothing to work with, and you'll likely get generic placeholder blocks in return.
Show Hierarchy Through Size and Position
The biggest box at the top of your sketch will be treated as the most prominent element. Smaller boxes nested inside a larger one will likely be interpreted as child components — like items in a list or cards in a grid.
If you want a three-column layout, draw three equally sized boxes side by side. If you want a hero section with a call-to-action button below it, make the hero box large and the button box small and centered underneath.
You're essentially communicating visual hierarchy the same way you would to a human designer — just be a bit more explicit about it.
Include Simple Icons or Symbols
A star shape next to "Rating" will often be interpreted correctly by visual AI. A simple hamburger menu icon (three horizontal lines) in the top corner signals mobile navigation. A magnifying glass near a text field signals search.
Don't get artistic. Stick to universally recognized symbols. A detailed hand-drawn illustration of a shopping cart will confuse the AI more than a simple cart icon.
Draw Multiple Screens If Your App Has Navigation
If your app idea has a home screen, a profile page, and a settings page, sketch each one separately and label them "Screen 1: Home," "Screen 2: Profile," "Screen 3: Settings." Upload them together or sequentially. In your prompt, describe how the screens connect — for example, which button on Screen 1 should lead to Screen 2. Whether the AI can generate fully linked navigation will depend on the tool's current capabilities, but providing this context gives it the best chance of understanding your intent.
Step-by-Step: From Paper to Working Preview
Here's the general workflow, broken into clear steps. Some details may vary depending on the current state of Gemini Canvas's interface, so adapt as needed.
Step 1: Draw your wireframe on plain white paper. Use a dark pen or marker — not pencil. High contrast matters for photo recognition. Leave margins. Don't crowd elements to the edges of the page.
Step 2: Photograph the sketch in good lighting. Natural light works best. Avoid shadows falling across the paper. Shoot from directly above so there's no perspective distortion. Your phone camera is fine — you don't need a scanner.
Step 3: Open Gemini Canvas and start a new project. Upload your photo. The AI should analyze the image and begin generating a preview or ask clarifying questions.
Step 4: Provide context with your upload. Don't just upload the image silently. Tell Gemini what you're building. This is where a good prompt makes all the difference.
Step 5: Review the first preview. The AI will generate a visual version of your sketch. Look through it carefully. Check that the layout matches your intent, that labels are correct, and that the basic structure makes sense.
Step 6: Iterate through conversation. This is the powerful part. You shouldn't need to redraw anything. Describe what to change in plain language: "Make the header blue," "Add a fourth menu item called Pricing," "Switch the layout to two columns instead of three," "Make the buttons rounded." The effectiveness of conversational iteration is a core promise of tools like Gemini Canvas — and it's the workflow pattern that makes AI prototyping dramatically faster than traditional methods.
Step 7: Export or share. Once you're happy with the prototype, look for options to share a link or export the preview. If you're handing this off to a developer, ask Gemini if it can show the underlying code or markup — this could give your dev team a useful starting point, though the quality and completeness of any generated code will vary.
Prompts That Actually Work
The prompt you pair with your sketch upload matters more than most people realize. Here are four you can copy and adapt. These are structured to work well with any AI prototyping tool, not just Gemini Canvas.
Prompt 1: Basic App Preview
This is a hand-drawn wireframe for a mobile app that helps dog walkers schedule appointments. Please generate a working app preview based on this layout. Use a clean, modern design with a white background and blue accent color. Make all buttons and navigation elements functional where possible.
Why this works: It names the purpose (dog walker scheduling), specifies visual preferences (clean, modern, white and blue), and sets expectations for interactivity. Adapt it by swapping in your own app concept and color preferences.
Prompt 2: Small Business Landing Page
This sketch shows a landing page for a local bakery. The top section is a hero image area with the bakery name. Below that are three boxes showing featured products. At the bottom is a contact form. Please turn this into a web page preview with warm, inviting colors and a font that feels friendly but professional.
Why this works: It walks through the sketch section by section, removing ambiguity. The style direction ("warm, inviting," "friendly but professional") gives the AI a design vocabulary to work with. Replace "bakery" with your business type and adjust the section descriptions.
Prompt 3: Multi-Screen App
I'm uploading three sketches. Screen 1 is the home dashboard. Screen 2 is a detail view when you tap an item. Screen 3 is a settings page. Please generate previews for all three screens. Tapping items on Screen 1 should ideally navigate to Screen 2, and tapping the gear icon should navigate to Screen 3. If full navigation isn't possible, please generate each screen as a separate preview.
Why this works: It describes the relationship between screens clearly and provides a graceful fallback if the tool can't handle linked navigation. This kind of flexible prompting avoids frustration when a feature doesn't work exactly as expected.
Prompt 4: Iteration After First Preview
The preview looks good, but I need these changes: (1) Move the search bar above the product grid, not below it. (2) Change the green buttons to dark navy. (3) Add a "Sign Up" button in the top right corner of the header. (4) Make the footer sticky so it stays visible when scrolling.
Why this works: Numbered, specific requests are easier for AI to process than paragraph-form descriptions. Each change is unambiguous. Use this structure for your own iteration rounds — list changes, be specific, and number them.
Notice what these prompts have in common: they describe the purpose of the app, specify visual preferences, and give clear instructions about behavior. The more context you provide, the fewer revision rounds you'll need.
Common Mistakes That Produce Broken Layouts
I've seen a lot of people try AI sketch-to-prototype tools and get frustrated. Almost every time, the problem traces back to one of these mistakes.
Sketching Too Small
If your entire wireframe fits on a sticky note, the AI will struggle to distinguish individual elements. Use a full sheet of paper. Give each component room to breathe. A cramped sketch produces a cramped, overlapping layout.
Forgetting to Label Elements
An unlabeled box is ambiguous. Is it an image placeholder? A text block? A button? A card? The AI will guess, and it will often guess wrong. Every rectangle on your sketch should have a label — even if it's just "image" or "text block."
Using Pencil in Low Light
Light pencil lines on white paper, photographed under a desk lamp, produce a low-contrast image that AI can barely parse. Use a dark marker. Photograph in bright, even light. This single change fixes more problems than any prompt engineering.
Drawing Decorative Elements
Curly borders, decorative arrows, doodles in the margins — these confuse the AI. It tries to interpret every mark on the page as a UI element. Keep your sketch clean and functional. Save the aesthetics for the iteration phase, where you can describe the style you want in words.
Expecting Back-End Functionality
If your sketch includes a login form, the AI will likely create a login form that looks real and may accept text input. But it won't actually authenticate users. If you sketch a payment page, you'll get a visual payment form that doesn't process transactions. Remember: this is a prototype, not a product. Set expectations accordingly, especially if you're showing this to a client or stakeholder.
Not Iterating Enough
The first preview is rarely perfect. That's by design. The power of this workflow is in the conversation — the back-and-forth where you refine colors, adjust spacing, add elements, and reshape the layout. People who upload once, see an imperfect result, and give up are missing the entire point. Plan for three to five rounds of iteration.
How to Hand This Off to a Developer
Let's say you've built a prototype you're happy with. Now what?
If you're working with a developer — whether that's a freelancer, an agency, or a technical co-founder — the prototype itself is incredibly valuable as a communication tool. Instead of describing what you want in a long email full of misunderstandable phrases like "clean and modern," you can share a visual preview that shows exactly what you mean.
Explore whether Gemini Canvas offers options to export or display any generated code or markup. If it does, a developer can use this as a starting point, adapting the front-end structure and connecting it to real data, authentication, and business logic. Even if the generated code isn't production-ready, it's a meaningful head start compared to building from a verbal description or a static mockup.
If code export isn't available, the visual prototype itself is still valuable. Take screenshots, record a screen walkthrough, and annotate the key interactions. Developers are accustomed to working from visual references, and a clear prototype — even one that's just a series of screenshots with annotations — dramatically reduces miscommunication.
For small business owners exploring AI tools, this workflow can save significant time and money in the early prototyping phase. You're not replacing developers — you're making the handoff to developers dramatically more efficient.
A Self-Check Before You Share Your Prototype
Before you send your AI-generated prototype to a developer, client, or co-founder, run through this quick checklist:
- Does the layout match your intent? Compare the prototype side-by-side with your original sketch. Flag any elements that moved, merged, or disappeared.
- Are all labels accurate? AI sometimes misreads handwriting or substitutes similar-sounding words. Check every piece of text.
- Is the visual hierarchy correct? The most important element should be the most prominent. If your call-to-action button is smaller than your footer text, iterate.
- Have you tested on mobile and desktop views? If the tool offers responsive previews, check both. A layout that looks great on desktop may collapse on mobile.
- Did you clearly label what's a prototype vs. what's real? When sharing with non-technical stakeholders, explicitly state that this is a visual prototype — not a working application. This prevents misunderstandings about timeline and budget.
- Have you documented your iteration history? Keep notes on what you changed and why. This context is gold for a developer who picks up the project later.
Where This Fits in the Bigger AI Toolkit Picture
The Gemini sketch-to-app concept is interesting on its own, but it highlights a broader trend worth paying attention to: AI tools are becoming more visual, more conversational, and more integrated.
A year ago, most AI tools were text-in, text-out. You typed a prompt, you got words back. Now you're uploading photos, getting visual previews, generating images, creating videos, and producing music — often within the same conversation.
This is why having access to multiple AI models in one place matters so much for practical work. Your creative workflow might start with a sketch-to-prototype tool, then move to an AI writing assistant for the app's copy, then to an image generator for placeholder graphics, then to a video tool for a demo walkthrough. Switching between six different platforms for six different tasks is a productivity killer.
An all-in-one AI tool that handles text, images, video, and music generation from a single dashboard eliminates that friction. If you're exploring what's possible with AI beyond just chat, it's worth checking out what's available at Gab AI — especially if you're the kind of person who prototypes ideas quickly and needs multiple creative outputs in one sitting.
Quick Start: What You Can Do in 10 Minutes
If you want to test this workflow right now, here's your ten-minute plan:
- Grab a sheet of white paper and a dark marker.
- Draw three rectangles stacked vertically: a header, a main content area, and a footer.
- Inside the header, write your app or page name.
- Inside the main content area, draw three smaller boxes side by side — these are feature cards or product listings.
- Inside the footer, write "Contact Us" and draw a small box labeled "Email" and another labeled "Submit."
- Photograph it from above in good light.
- Upload it to Gemini Canvas with this prompt: "This is a wireframe for a simple landing page for [your business/idea]. Please generate a working preview with a modern, clean design."
- Review the result and ask for two specific changes.
That's it. In ten minutes, you should have a visual preview of a landing page that you can share with anyone. No code. No design degree. No expensive software subscription.
When This Workflow Works — and When It Doesn't
This approach works best when:
- You need to communicate a visual idea quickly to someone who isn't in the room.
- You're exploring multiple layout options and want to see them rendered fast.
- You're a non-technical founder or business owner who needs to brief a developer.
- You're a student prototyping a class project or portfolio piece.
This approach has limits when:
- You need pixel-perfect design accuracy. AI prototypes are approximations, not final designs.
- Your app requires complex interactions like drag-and-drop, real-time data, or multi-step workflows. These are beyond what current sketch-to-prototype tools handle.
- You're presenting to stakeholders who might mistake a prototype for a finished product. Always label prototypes clearly.
- You need accessibility compliance, responsive breakpoints, or brand-guideline-level precision. These require human design review.
Knowing these boundaries helps you use the tool confidently without over-promising.
The Bigger Takeaway
The real story here isn't about one feature from one company. It's about a shift in who gets to prototype ideas.
For decades, turning a concept into something visual and interactive required specialized skills or specialized budgets. That barrier kept a lot of good ideas trapped on napkins and whiteboards. AI tools like this don't replace the people who build real software — but they give everyone else a way to communicate their vision clearly, test assumptions cheaply, and move faster from "what if" to "here's what I mean."
If you've been sitting on an app idea, a landing page concept, or a tool you wish existed for your business, you now have a way to see it come to life in an afternoon. The sketch doesn't have to be pretty. It just has to be clear.
Pick up a marker. Draw the thing. And let AI handle the translation.
For more practical walkthroughs like this, explore our guides and how-to articles — or start creating text, images, videos, music, and more in one place at gab.ai.